


文章摘要(AI生成)
该文章介绍了在日常工作中使用spring或手动创建连接时,dbcp的操作流程。通过手动创建数据连接并进行查询的示例,展示了如何设置数据源、创建连接、创建语句、执行语句等操作。通过代码走读,详细介绍了dbcp是如何创建数据库连接池并帮助在查询时获取可用的数据库连接。在这个过程中,首先需要创建一个驱动连接工厂,然后调用DriverManagerConnectionFactory创建数据库连接实例。最终通过DriverManager完成数据库连接的创建。文章通过代码实例和时序图的方式,介绍了dbcp在数据源创建和数据库连接管理中的作用。
日常,我们通过spring或者手动创建连接时,dbcp会做哪些操作呢?以手动根据dbcp创建数据连接并查询为例:
	public void test(){
		System.out.println("Setting up data source.");
		DataSource dataSource = setupDataSource("jdbc:mysql://localhost:3306/db?username=root&password=123456");
		System.out.println("Done.");
		Connection conn = null;
		Statement stmt = null;
		ResultSet rset = null;

		try {
			System.out.println("Creating connection.");
			conn = dataSource.getConnection();
			System.out.println("Creating statement.");
			stmt = conn.createStatement();
			System.out.println("Executing statement.");
			rset = stmt.executeQuery("select 1=1");
			System.out.println("Results:");
			int numcols = rset.getMetaData().getColumnCount();
			while(rset.next()) {
				for(int i=1;i<=numcols;i++) {
					System.out.print("\t" + rset.getString(i));
				}
				System.out.println("");
			}
		} catch(SQLException e) {
			e.printStackTrace();
		} finally {
			try { if (rset != null) rset.close(); } catch(Exception e) { }
			try { if (stmt != null) stmt.close(); } catch(Exception e) { }
			try { if (conn != null) conn.close(); } catch(Exception e) { }
		}
	}


	public static DataSource setupDataSource(String connectURI) {
		ConnectionFactory connectionFactory =
				new DriverManagerConnectionFactory(connectURI,null);
		PoolableConnectionFactory poolableConnectionFactory =
				new PoolableConnectionFactory(connectionFactory, null);
		ObjectPool<PoolableConnection> connectionPool =
				new GenericObjectPool<>(poolableConnectionFactory);
		poolableConnectionFactory.setPool(connectionPool);
		PoolingDataSource<PoolableConnection> dataSource =
				new PoolingDataSource<>(connectionPool);
		return dataSource;
	}
这个过程中我们dbcp是如何创建数据库连接池并帮助我们在查询时获取可用的数据库连接呢?
代码走读-数据源创建
创建数据源的时序图:
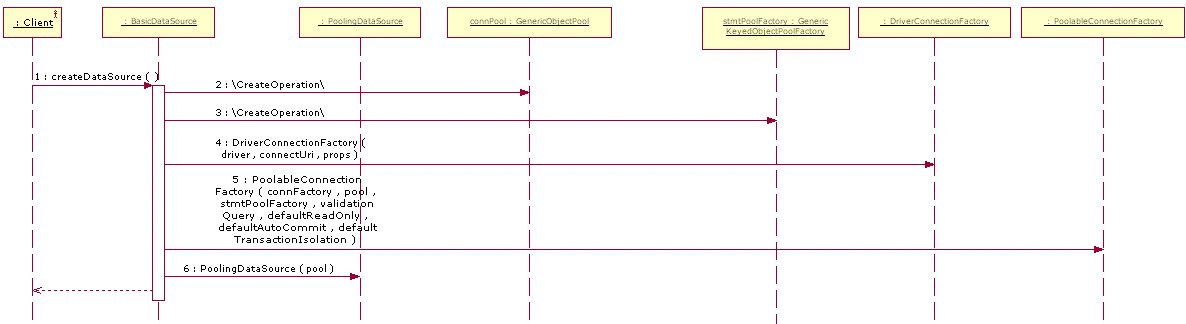
驱动连接工厂-创建数据库连接
在我们调用
ConnectionFactory connectionFactory =
				new DriverManagerConnectionFactory(connectURI,null);
即创建一个池化的数据源前,首先需要创建一个驱动链接的工厂, 那么我们首先看下DriverManagerConnectionFactory帮我们做了什么。
DriverManagerConnectionFactory
DriverManagerConnectionFactory为我们定义了一个数据库各驱动连接的工厂,会根据我们输入的数据库链接、属性、用户名和密码,选用不同的数据库驱动创建不同的数据库连接实例。
    public DriverManagerConnectionFactory(final String connectionUri, final Properties properties) {
        this.connectionUri = connectionUri;
        this.properties = properties;
        this.userName = null;
        this.userPassword = null;
    }
这个DriverManagerConnectionFactory的其实现了ConnectionFactory接口,我们调用createConnection方法即可完成数据库连接的创建:
public interface ConnectionFactory {
    Connection createConnection() throws SQLException;
}
在这个驱动管理器连接工厂中,数据库驱动链接创建的实现方式为:
    @Override
    public Connection createConnection() throws SQLException {
        if (null == properties) {
            if (userName == null && userPassword == null) {
                return DriverManager.getConnection(connectionUri);
            }
            return DriverManager.getConnection(connectionUri, userName, Utils.toString(userPassword));
        }
        return DriverManager.getConnection(connectionUri, properties);
    }
可见,它本质调用了DriverManager.getConnection方法完成了数据库连接的创建。
DriverManager
DriverManager为驱动管理器,当我们有多个数据源配置时,就需要通过一个管理器集中维护这些数据源的配置。DriverManager的初始化在DriverManagerConnectionFactory中以静态块的方式实现。
    static {
        DriverManager.getDrivers();
    }
然后在DriverManager中也有驱动的初始化静态块:
static {
    loadInitialDrivers();
    println("JDBC DriverManager initialized");
}
这个初始化所有驱动的方法里,DBCP通过ServiceLoader.load(Driver.class)加载了所有继承Driver接口的实现类,也是驱动管理的核心实现所在。
 private static void loadInitialDrivers() {
        String drivers;
        try {
            drivers = AccessController.doPrivileged(new PrivilegedAction<String>() {
                public String run() {
                    return System.getProperty("jdbc.drivers");
                }
            });
        } catch (Exception ex) {
            drivers = null;
        }
        AccessController.doPrivileged(new PrivilegedAction<Void>() {
            public Void run() {

                ServiceLoader<Driver> loadedDrivers = ServiceLoader.load(Driver.class);
                Iterator<Driver> driversIterator = loadedDrivers.iterator();
                try{
                    while(driversIterator.hasNext()) {
                        driversIterator.next();
                    }
                } catch(Throwable t) {
                // Do nothing
                }
                return null;
            }
        });

        println("DriverManager.initialize: jdbc.drivers = " + drivers);

        if (drivers == null || drivers.equals("")) {
            return;
        }
        String[] driversList = drivers.split(":");
        println("number of Drivers:" + driversList.length);
        for (String aDriver : driversList) {
            try {
                println("DriverManager.Initialize: loading " + aDriver);
                Class.forName(aDriver, true,
                        ClassLoader.getSystemClassLoader());
            } catch (Exception ex) {
                println("DriverManager.Initialize: load failed: " + ex);
            }
        }
    }
这个实现类即是我们通过mysql等各种数据库驱动包里面实现的,比如mysql对应的实现就是mysql-connector-java驱动中的com.mysql.cj.jdbc.Driver类,在该子类中他又定义了一个静态块用来向DriverManager中注册驱动。
public class Driver extends NonRegisteringDriver implements java.sql.Driver {
    static {
        try {
            java.sql.DriverManager.registerDriver(new Driver());
        } catch (SQLException E) {
            throw new RuntimeException("Can't register driver!");
        }
    }

    public Driver() throws SQLException {
        // Required for Class.forName().newInstance()
    }
}
而ServiceLoader.load(Driver.class)我们仔细看其实现,不难发现其本质就是用反射的机制来加载所有实现了Dirver的类:
    public static <S> ServiceLoader<S> load(Class<S> service) {
        ClassLoader cl = Thread.currentThread().getContextClassLoader();
        return ServiceLoader.load(service, cl);
    }

    public static <S> ServiceLoader<S> load(Class<S> service,
                                            ClassLoader loader)
    {
        return new ServiceLoader<>(service, loader);
    }

    private ServiceLoader(Class<S> svc, ClassLoader cl) {
        service = Objects.requireNonNull(svc, "Service interface cannot be null");
        loader = (cl == null) ? ClassLoader.getSystemClassLoader() : cl;
        acc = (System.getSecurityManager() != null) ? AccessController.getContext() : null;
        reload();
    }
数据源连接池-维护数据库连接池
接下来我们看数据库连接池初始化,我们在客户端开发时,使用了以下几步:
PoolableConnectionFactory poolableConnectionFactory = new PoolableConnectionFactory(connectionFactory, null);
ObjectPool<PoolableConnection> connectionPool = new GenericObjectPool<>(poolableConnectionFactory);
poolableConnectionFactory.setPool(connectionPool);
PoolingDataSource<PoolableConnection> dataSource = new PoolingDataSource<>(connectionPool);
PoolingDataSource
我们从最终实例化的对象PoolingDataSource入手,这个对象维护了一个抽象对象池对象pool,我们这里抽象池对象的具体实现为new GenericObjectPool<>(poolableConnectionFactory)。查看PoolingDataSource的构造方法,我们可以看到,它的构造方法实际是根据我们传入的GenericObjectPool,初始化了PoolingDataSource内部的对象池.
private final ObjectPool<C> pool;

public PoolingDataSource(final ObjectPool<C> pool) {
        Objects.requireNonNull(pool, "Pool must not be null.");
        this.pool = pool;
        if (this.pool instanceof GenericObjectPool<?>) {
            final PoolableConnectionFactory pcf = (PoolableConnectionFactory) ((GenericObjectPool<?>) this.pool)
                    .getFactory();
            Objects.requireNonNull(pcf, "PoolableConnectionFactory must not be null.");
            if (pcf.getPool() != this.pool) {
                log.warn(Utils.getMessage("poolingDataSource.factoryConfig"));
                final ObjectPool<PoolableConnection> p = (ObjectPool<PoolableConnection>) this.pool;
                pcf.setPool(p);
            }
        }
}
GenericObjectPool
而我们在创建GenericObjectPool时,GenericObjectPool的构造方法又会根据我们传入的poolableConnectionFactory来初始化GenericObjectPool内部的对象池和池对象创建工厂。当然这时对象池还为空。
private final LinkedBlockingDeque<PooledObject<T>> idleObjects;

public GenericObjectPool(final PooledObjectFactory<T> factory) {
        this(factory, new GenericObjectPoolConfig<>());
    }

    public GenericObjectPool(final PooledObjectFactory<T> factory,
            final GenericObjectPoolConfig<T> config) {

        super(config, ONAME_BASE, config.getJmxNamePrefix());

        if (factory == null) {
            jmxUnregister(); // tidy up
            throw new IllegalArgumentException("Factory may not be null");
        }
        this.factory = factory;

        idleObjects = new LinkedBlockingDeque<>(config.getFairness());

        setConfig(config);
}
PoolableConnectionFactory
PoolableConnectionFactory是我们创建池对象的工厂类,负责创建对应的池对象PoolConnection,PoolConnection是一个委托连接,它不是关闭底层连接,而是在关闭时将自身返回到连接池中(具体可以看close方法)。
代码走读-连接池使用
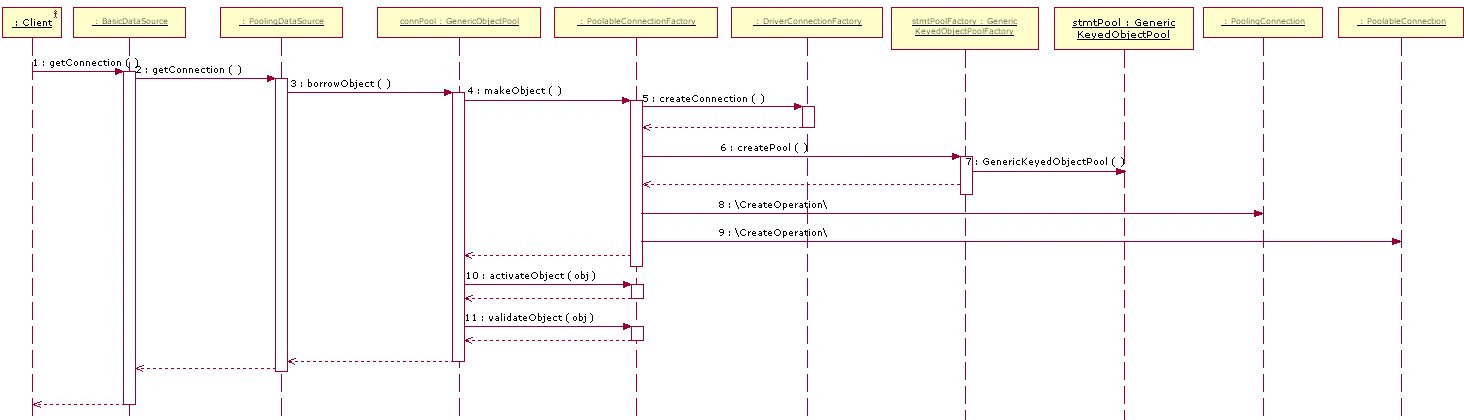
PoolingDataSource.getConnection
当我们调用getConnection()方法时,PoolingDataSource会调用具体对象池的borrowObject()方法从我们具体对象池中取出可用的数据库连接。
    @Override
    public Connection getConnection() throws SQLException {
        try {
            final C conn = pool.borrowObject();
            if (conn == null) {
                return null;
            }
            return new PoolGuardConnectionWrapper<>(conn);
        } catch (final NoSuchElementException e) {
            throw new SQLException("Cannot get a connection, pool error " + e.getMessage(), e);
        } catch (final SQLException | RuntimeException e) {
            throw e;
        } catch (final InterruptedException e) {
            // Reset the interrupt status so it is visible to callers
            Thread.currentThread().interrupt();
            throw new SQLException("Cannot get a connection, general error", e);
        } catch (final Exception e) {
            throw new SQLException("Cannot get a connection, general error", e);
        }
    }
GenericObjectPool.borrowObject()
borrowObject()是对具体取用逻辑的实现,这个需要考虑怎么去对象池取对象:如果对象池没有需要创建对象;如果对象池对象都在使用,则需要等待对象空闲,那就需要考虑如何判断对象是否在使用
这里画个流程图,来看这个方法具体都做了什么(含create方法):

连接池创建&使用过程总结
DBCP在创建连接时总共调用的类图如下:

但是还有些问题未具体排查,诸如配置setTimeBetweenEvictionRuns、setTimeBetweenEvictionRunsMillis这些参数都是如何生效的,连接池配置、连接配置、驱动配置都是在哪里作用的,这些到下一篇再讲。


评论区